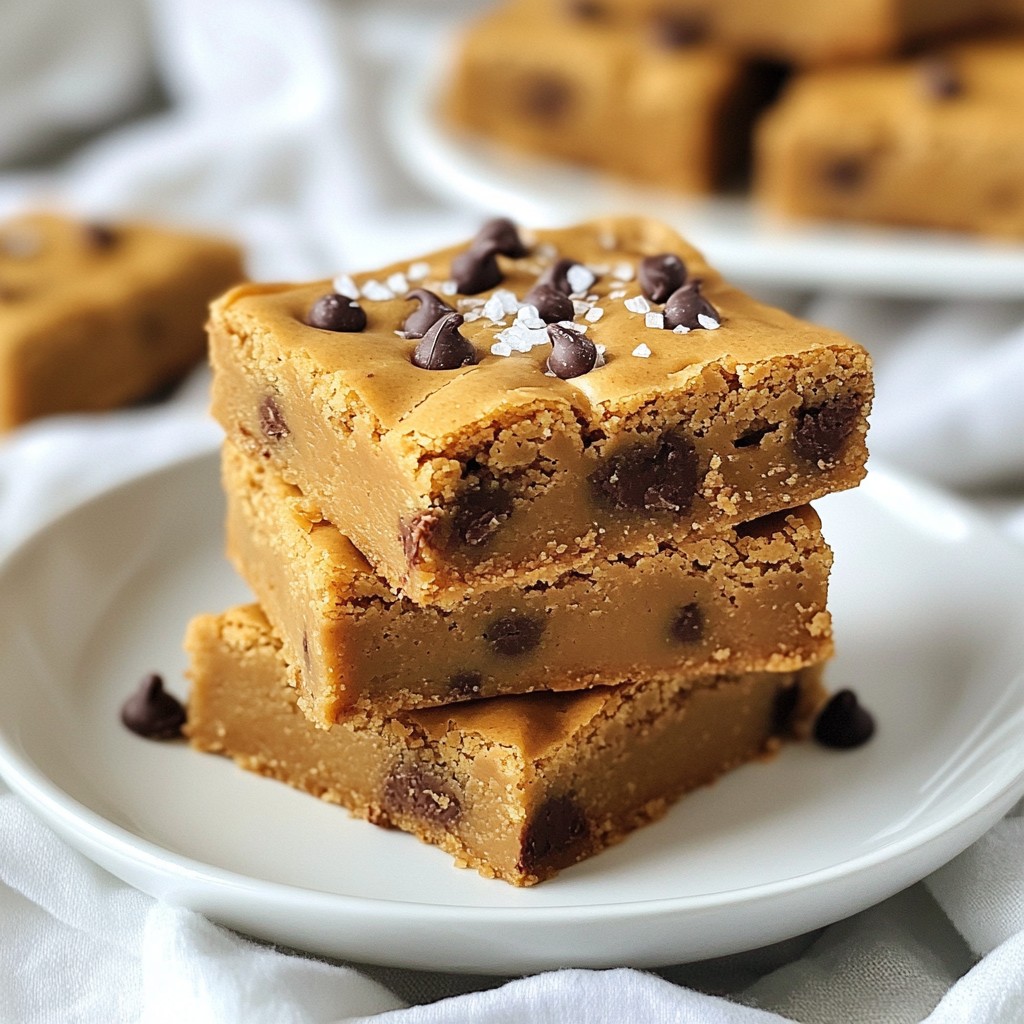
Do you crave a sweet, chewy treat that’s easy to make? Look no further than Peanut Butter Chocolate Chip Blondies! These delightful bars combine rich peanut butter with melty chocolate chips, creating a mouthwatering snack for any occasion. In this blog, I’ll guide you through the simple steps to whip up these delicious blondies, share ingredient tips, and offer ideas for fun variations. Let’s make something amazing together!
Why I Love This Recipe
- Delicious Flavor Combination: The rich, creamy peanut butter pairs perfectly with the sweetness of chocolate, creating a mouthwatering treat.
- Easy to Make: This recipe requires minimal ingredients and steps, making it perfect for bakers of all skill levels.
- Customizable: Add your favorite nuts or experiment with different types of chocolate to make these blondies your own.
- Perfect for Sharing: These blondies cut into neat squares, making them a great option for parties, picnics, or just sharing with family and friends.
Ingredients
Complete List of Ingredients for Peanut Butter Chocolate Chip Blondies
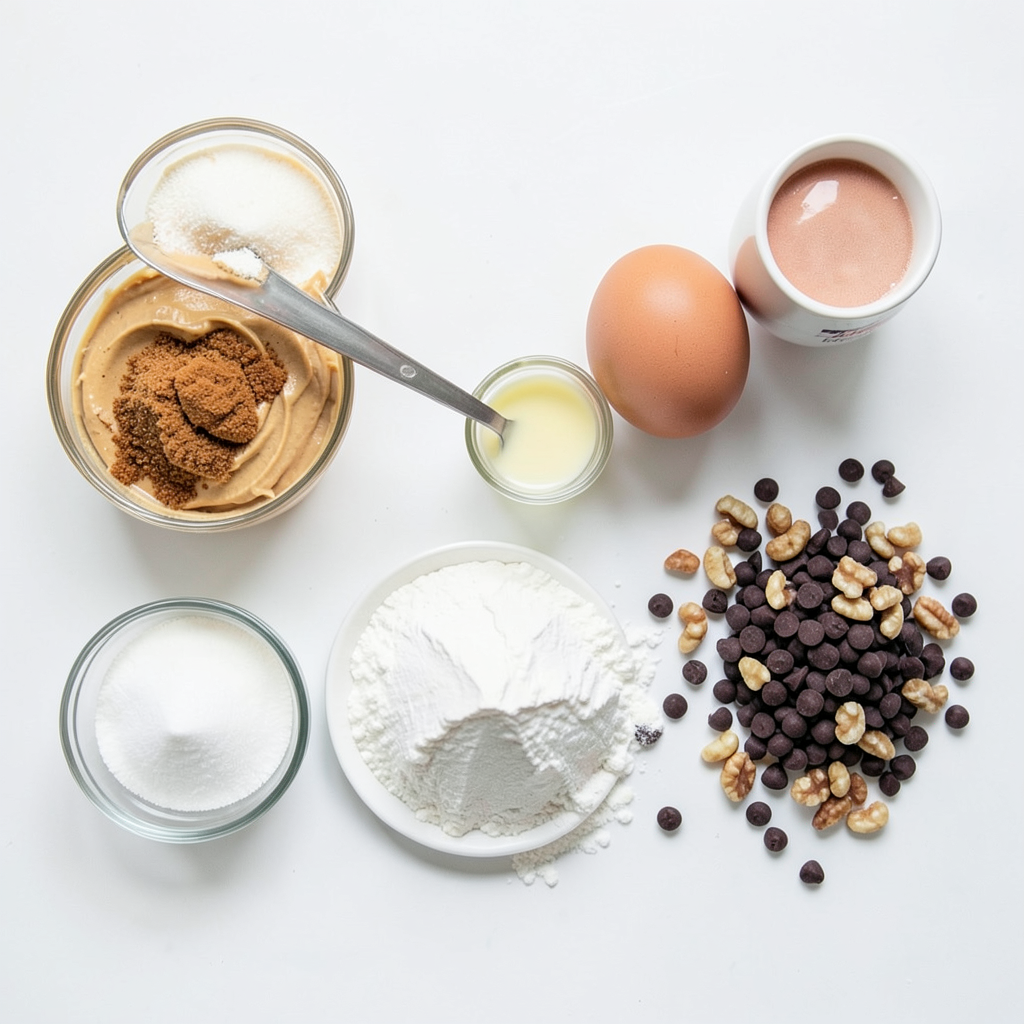
To make these peanut butter chocolate chip blondies, you need:
- 1 cup creamy peanut butter
- 1 cup packed brown sugar
- 1/4 cup granulated sugar
- 2 large eggs, at room temperature
- 1 teaspoon pure vanilla extract
- 1 teaspoon baking soda
- 1/2 teaspoon salt
- 1 cup all-purpose flour
- 1 cup chocolate chips (use semi-sweet or milk chocolate)
- 1/2 cup chopped nuts (optional; walnuts or pecans work well)
Ingredient Substitutions
You can swap some ingredients if needed. Here are a few ideas:
- Use almond butter instead of peanut butter for a nut-free option.
- Try coconut sugar instead of brown sugar for a lower glycemic index.
- Substitute flax eggs for regular eggs to make it vegan.
- Use gluten-free flour to make this dish gluten-free.
Tips for Choosing Quality Ingredients
Choosing good ingredients makes a big difference. Here are my tips:
- Pick fresh eggs; they should feel heavy and have a smooth shell.
- Use natural peanut butter without added sugar or oils for better taste.
- Select high-quality chocolate chips for a rich flavor.
- Always check the expiration dates on your ingredients.
Good quality ingredients help make the best blondies!
Step-by-Step Instructions
Prepping the Oven and Baking Pan
Start by preheating your oven to 350°F (175°C). This step is key for even baking. Next, grab an 8x8 inch baking pan. Lightly grease it to prevent sticking. I recommend lining it with parchment paper. Let some paper hang over the edges. This makes it easy to lift out the blondies later.
Mixing the Wet Ingredients
In a large mixing bowl, combine 1 cup of creamy peanut butter, 1 cup of packed brown sugar, and 1/4 cup of granulated sugar. Use a spatula or electric mixer to blend till smooth. This mixture should be creamy and well combined. Once it’s smooth, add 2 large eggs one at a time. Mix well after each egg. Lastly, stir in 1 teaspoon of pure vanilla extract for a great flavor boost.
Combining Dry Ingredients and Forming the Batter
In a separate bowl, whisk together 1 teaspoon of baking soda, 1/2 teaspoon of salt, and 1 cup of all-purpose flour. This helps to mix the leavening agent and salt evenly. Gradually add this dry mixture to your wet ingredients. Stir gently until you no longer see dry flour. Be careful not to overmix, as this can change the texture. After that, fold in 1 cup of chocolate chips and 1/2 cup of optional chopped nuts. Make sure they are evenly spread in the batter.
Baking Time and Tips for Optimal Results
Pour the batter into the prepared baking pan. Use a spatula to spread it evenly in the pan. Place the pan in your preheated oven and bake for 20-25 minutes. Watch closely as it bakes. The blondies are done when the edges turn golden brown. Insert a toothpick into the center; it should come out with a few moist crumbs. After baking, remove the pan and let it cool for about 10 minutes. Lift the blondies out using the parchment paper. Transfer them to a wire rack to cool completely before slicing into squares.
Tips & Tricks
Achieving the Perfect Texture
To get the best texture for your blondies, mix the wet ingredients well. Blend the creamy peanut butter with the sugars until smooth. Add the eggs one at a time. This helps them mix in evenly. When adding the flour, mix just until you see no dry flour. Overmixing can make them tough. You want them soft and chewy, not hard.
Cooling and Serving Suggestions
After baking, let the blondies cool in the pan for ten minutes. Use the parchment paper to lift them out. Place them on a wire rack to cool completely. This will help them set. For serving, stack the blondies nicely on a plate. Drizzle melted chocolate over them. A sprinkle of sea salt adds a nice touch. They look fancy and taste amazing!
Common Mistakes to Avoid
One common mistake is overmixing the batter. This can lead to tough blondies. Another mistake is not checking the baking time. Keep an eye on the oven. The edges should be golden brown, and a toothpick should have moist crumbs. Lastly, don’t skip the cooling step. Cutting them too early can result in a gooey mess!
Pro Tips
- Use Room Temperature Eggs: Allowing your eggs to reach room temperature ensures better incorporation into the batter, leading to a fluffier texture in your blondies.
- Don't Overmix the Batter: Mixing just until the dry ingredients are incorporated will help maintain a soft and chewy texture. Overmixing can lead to dense blondies.
- Check for Doneness: Start checking your blondies a few minutes before the suggested baking time. They should be golden brown at the edges and a toothpick should come out with a few moist crumbs.
- Experiment with Mix-Ins: Feel free to add different types of chocolate chips or nuts to customize your blondies. Try adding white chocolate chips or toffee bits for a unique twist!
Variations
Gluten-Free Adaptations
You can make these blondies gluten-free with easy swaps. Use gluten-free flour instead of all-purpose flour. This change keeps the taste while making it safe for those with gluten issues. Look for a blend that includes rice flour, potato starch, and tapioca flour. These blends work well and provide great texture.
Nut-Free Options
If you need a nut-free version, skip the peanut butter. Try sunflower seed butter instead. It has a similar creamy texture and taste. This option works well for schools or gatherings where nuts are not allowed. Just ensure the chocolate chips you choose are also nut-free.
Flavor Variations
Spice things up by adding flavors to your blondies. Mix in a teaspoon of cinnamon for warmth. You can also add a pinch of nutmeg for a cozy touch. Want something different? Try a few tablespoons of cocoa powder for a chocolate twist. This will change the color and flavor while keeping the blondie base. You can even add a splash of almond extract for a unique taste. Experimenting makes baking fun!
Storage Info
Best Practices for Storing Blondies
To keep your peanut butter chocolate chip blondies fresh, store them in an airtight container. Make sure they cool completely before sealing. This will help prevent sogginess. You can place a piece of parchment paper between layers to avoid sticking. Keep the container at room temperature for up to three days. For longer storage, try freezing.
Freezing Tips for Longer Shelf Life
Freezing blondies is easy and keeps them tasty. Cut them into squares before freezing. Wrap each square tightly in plastic wrap. Then, place the wrapped squares in a freezer-safe bag. Make sure to label the bag with the date. The blondies can stay in the freezer for up to three months. When you're ready to enjoy, just thaw them at room temperature.
Reheating Instructions for a Fresh Taste
To reheat your blondies, preheat your oven to 350°F (175°C). Place the blondies on a baking sheet. Heat them for about 5-10 minutes, or until warm. You can also microwave them for about 10-15 seconds for a quick treat. Enjoy them warm for that fresh-from-the-oven taste!
FAQs
How do I know when my blondies are done baking?
You can check if your blondies are done when the edges turn golden brown. Insert a toothpick into the center; it should come out with a few moist crumbs. If there is wet batter on the toothpick, they need more time. Keep an eye on them during the last few minutes of baking.
Can I make these blondies ahead of time?
Yes, you can make these blondies ahead of time. They stay fresh for several days when stored correctly. Allow them to cool completely and then store them in an airtight container. You can also wrap them in plastic wrap for extra freshness.
What's the difference between blondies and brownies?
Blondies and brownies are both delicious baked treats, but they differ in flavor and ingredients. Blondies use brown sugar and vanilla for a sweet, caramel-like taste. Brownies use cocoa powder, giving them a rich chocolate flavor. Blondies have a lighter color, while brownies are dark and fudgy. Both are great, but each offers a unique taste!
You learned how to make tasty peanut butter chocolate chip blondies. We covered the key ingredients, where to find good ones, and how to swap certain items. The step-by-step guide made baking easy and clear. I shared tips for a great texture and common mistakes to watch for. You can also try different flavors and know how to store your blondies well. In the end, follow these steps to enjoy delicious treats anytime. Happy baking!