Ready to impress your friends with a stunning dessert? This Vanilla Bean Panna Cotta is rich, creamy, and oh-so-delicious! Follow my simple steps to craft this classic Italian treat that melts in your mouth. With just a few easy ingredients and tips for perfecting the texture, you’ll have a showstopper ready in no time. Dive in and let’s create something sweet together!
Why I Love This Recipe
- Decadent Flavor: The combination of heavy cream, milk, and vanilla creates a rich and creamy dessert that melts in your mouth.
- Easy to Make: With only a few simple ingredients and straightforward steps, this panna cotta is a breeze to prepare.
- Customizable: You can easily tweak this recipe by adding different flavors or toppings, making it versatile for any occasion.
- Impressive Presentation: The silky texture and vibrant garnishes make this dessert a showstopper at any dinner party or gathering.
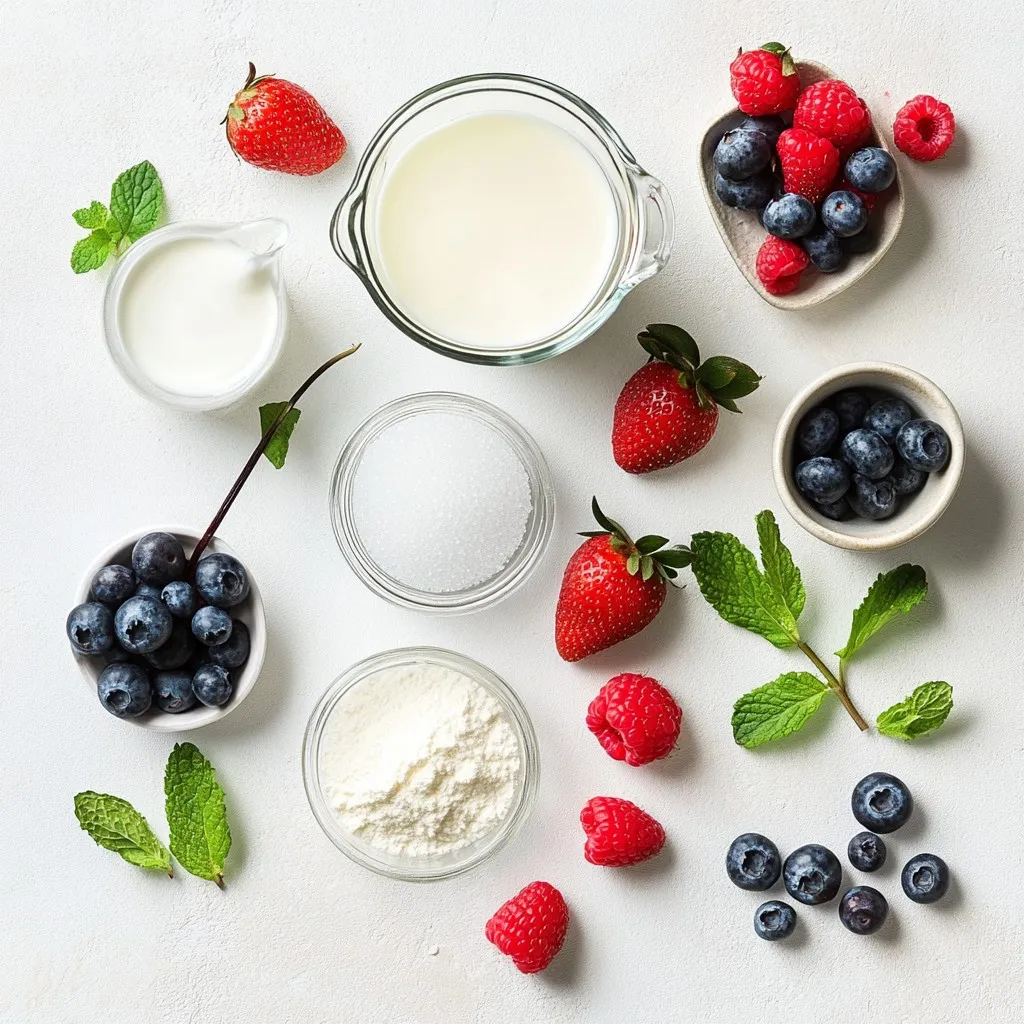
Ingredients
To make a rich and creamy vanilla bean panna cotta, gather these simple ingredients:
– 2 cups heavy cream
– 1 cup whole milk
– 1/2 cup granulated sugar
– 2 teaspoons vanilla bean paste (or the seeds from 1 vanilla bean)
– 2 1/2 teaspoons gelatin powder
– 3 tablespoons cold water
– A pinch of salt
– Fresh berries (such as strawberries, raspberries, or blueberries) and mint leaves for garnish
Each ingredient plays a crucial role in creating the smooth texture and rich flavor of panna cotta. The heavy cream and whole milk give it that luscious creaminess. The sugar adds sweetness, while the vanilla bean paste infuses it with a lovely aroma.
Gelatin is what helps the panna cotta set. It transforms the smooth mixture into a firm yet tender treat. Cold water activates the gelatin and helps it bloom before use. A pinch of salt balances the sweetness and enhances the flavor.
Finally, fresh berries and mint leaves not only add color but also provide a refreshing taste contrast. You can mix and match your favorite fruits for a fun twist!
Step-by-Step Instructions
Preparation overview
– Heating the cream mixture: Start by mixing 2 cups of heavy cream, 1 cup of whole milk, 1/2 cup of granulated sugar, 2 teaspoons of vanilla bean paste, and a pinch of salt in a medium saucepan. Heat this over medium heat for about 5-7 minutes. Stir often until the sugar fully dissolves. The mixture should be hot, but do not let it boil.
– Blooming the gelatin: While the cream heats, grab a small bowl. Sprinkle 2 1/2 teaspoons of gelatin powder over 3 tablespoons of cold water. Let it sit for 5 minutes. This allows the gelatin to absorb the water and become gel-like.
– Combining ingredients: Once your cream is hot, take it off the heat. Stir in the bloomed gelatin. Mix well until the gelatin fully dissolves and the mixture is smooth.
– Cooling and pouring: Let the mixture cool for about 10 minutes. Stir occasionally to stop a skin from forming. After it cools, carefully pour it into your serving cups or ramekins.
Refrigeration and setting
– Time needed to set: Cover each cup or ramekin with plastic wrap. Place them in the fridge for at least 4 hours. This time lets the panna cotta set and become firm.
– Covering the panna cotta: Make sure to cover each panna cotta well. This keeps it safe from any odors in the fridge.
Serving suggestions
– Running a knife around the edge: When ready to serve, take a small knife. Gently run it around the inside edge of the panna cotta. This helps to loosen it from the cup.
– Inverting onto a plate: If you want to flip it out, turn the panna cotta upside down onto a plate. With a little shake, it should come out smoothly. To finish, top it with fresh berries and a mint leaf for a lovely touch.
Tips & Tricks
Achieving the perfect texture
Timing and temperature are key for panna cotta. Heat the cream mixture slowly. Remove it from heat just before it boils. This keeps the texture smooth and creamy.
To avoid lumps, mix the gelatin well. Let it bloom first in cold water. This step helps it dissolve evenly in the warm cream.
Presentation enhancements
Use clear glass cups for a beautiful presentation. You can see the creamy layers, which looks lovely.
Layering fruits, like berries, adds color and flavor. Place them at the bottom or mix them in. This makes each bite exciting.
Common pitfalls to avoid
Overheating the mixture can ruin the panna cotta. Always keep an eye on the heat.
Not allowing enough time to set is another mistake. Chill it for at least 4 hours. This makes sure it firms up and holds its shape.
Pro Tips
- Use High-Quality Ingredients: The flavor of your panna cotta relies heavily on the quality of the cream and vanilla. Opt for organic heavy cream and pure vanilla bean paste for the best results.
- Don’t Skip the Blooming Process: Always allow the gelatin to bloom in cold water before adding it to the warm cream mixture. This step ensures a smooth and even texture in your panna cotta.
- Experiment with Flavors: While vanilla is classic, feel free to experiment by adding different flavors such as chocolate, coffee, or citrus zest to create your unique twist on panna cotta.
- Chill Properly: Make sure to refrigerate the panna cotta for at least 4 hours to achieve the perfect set. For best results, prepare it the night before serving.
Variations
Flavor adaptations
You can change the flavor of panna cotta easily. Try using almond extract instead of vanilla for a nutty touch. Citrus extracts, like lemon or orange, add a bright zing. For a rich twist, mix in some coffee or melted chocolate. These flavors mix well with the cream base, making each bite unique.
Dietary modifications
If you need dairy-free options, substitute heavy cream and milk with coconut milk or almond milk. These alternatives keep the panna cotta creamy and tasty. You can also use maple syrup or stevia instead of sugar for a healthier dessert. These swaps help you enjoy panna cotta while fitting your dietary needs.
Serving alternatives
Get creative with how you serve panna cotta. Layer it with granola and fresh fruit in a glass for a parfait that looks stunning. You can also chop up the panna cotta and add it to a trifle or mix it into a fruit salad. This approach gives you a fun and different dessert experience.
Storage Information
Storing leftover panna cotta
To keep your panna cotta fresh, store it in the fridge. Place it in an airtight container or cover each cup with plastic wrap. This keeps the panna cotta safe from odors and moisture. It will stay good for about three days in the fridge.
If you want to freeze it, first ensure the panna cotta is fully set. Place it in a freezer-safe container. Panna cotta can be frozen for about one month. To thaw, move it to the fridge for several hours or overnight. Never refreeze thawed panna cotta.
Shelf life
Panna cotta is best when fresh, but it can last. In the fridge, it stays fresh for about three days. After that, the texture and taste may change. If you freeze it, use it within one month for the best flavor.
For optimal freshness, always check for any off smells or changes in texture before using.
Recommendations for serving after storage
After storing, the panna cotta may lose some of its creamy texture. To revive it, gently stir it before serving. If it seems too firm, you can add a splash of cream or milk to soften it.
When ready to serve, garnish with fresh berries and mint. This adds a burst of color and flavor. If you want to impress, serve in clear cups to show off the lovely layers. Enjoy your delicious panna cotta!
FAQs
What is panna cotta?
Panna cotta is a classic Italian dessert. It means “cooked cream” in Italian. This dessert is smooth, creamy, and has a delicate flavor. It originated in the northern part of Italy. Traditionally, cooks would use simple ingredients like cream, sugar, and gelatin.
Can I make panna cotta in advance?
Yes, you can make panna cotta ahead of time. It sets well in the fridge. I often prepare it the night before a meal. This way, it is ready when you need it. Just remember to cover it well. This keeps it fresh and prevents it from absorbing other flavors.
Is gelatin necessary for panna cotta?
Gelatin helps panna cotta set. However, if you want an alternative, you can use agar-agar. Agar-agar comes from seaweed and is a great vegetarian option. You may need to adjust the amount. Always check the package for specific instructions.
How do I know when panna cotta is set?
You can tell panna cotta is set by its texture. It should feel firm to the touch but still jiggle slightly. The top should look smooth and glossy. If you press gently, it should hold its shape.
You learned about panna cotta, from its simple ingredients to how to make it. We covered step-by-step instructions to achieve a smooth texture, along with tips to impress. Variations let you adapt flavors and dietary needs. Remember to store leftovers properly for the best taste. Panna cotta is versatile and easy to make, perfect for any dessert lover. Enjoy experimenting with flavors and serving styles, and share this delightful treat with other